회고를 한번 해보자!
회사는 일한지 2년이 넘었으며 기술 블로그 운영이 4년 차이다!
배경
회고를 하게된 배경은 이제 기술 블로그를 운영한지 약 4년정도가 되었고 이 블로그의 시작은 어땠는지 그리고 앞으로의 방향은 어떤지 여기는 어떤 공간인지를 정리해보고자 회고를 하게 되었다.
블로그에 글을 작성하다가 가끔 “아 이렇게까지 자세히 써야하나?”, “아 이 내용을 더 추가하면 좋을거 같은데…”, “이렇게까지 모양과 디자인에 신경써야 하나?!” 그리고 “아 글이 너무 쉽나?!” 또는 “너무 좁은 분야인가?!” 이런 생각들을 최근들어서 하는거 같다. 어느덧 실시간 접속자수와 하루 접속자수 그리고 방문하게 되는 분들을 고려하게 되었다. 그러면서 어디에 초점을 맞춰야할지를 생각하게 된거 같다. 여기 블로그는 기술을 정리하는 곳? 아니면 공부한걸 정리하는 곳? 아니면 그 모두 다일까?!
의심의 흐름대로 생각나는대로 정리할 예정이라 약간? 두서가 없을수도 있다. 하하!
블로그의 현 상황
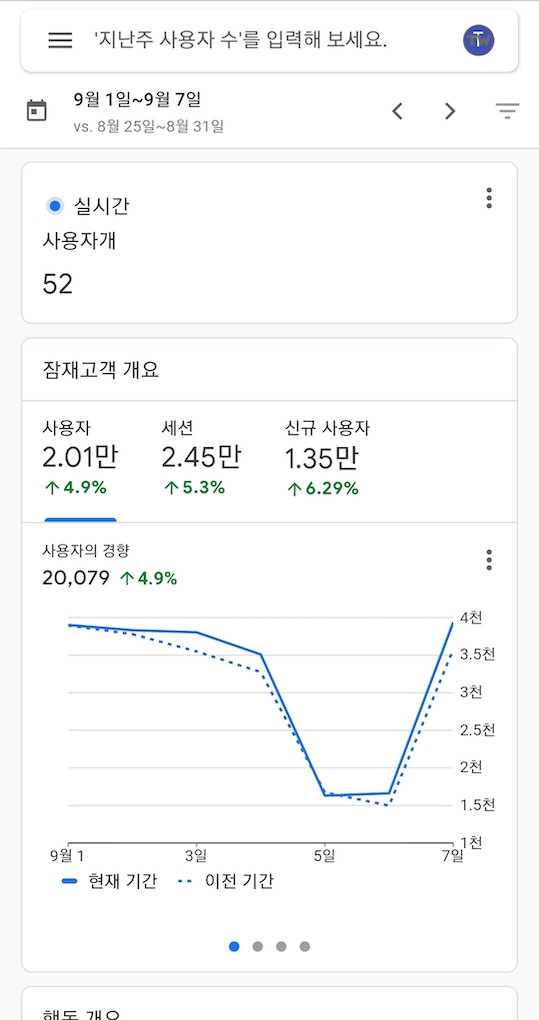
- 3개월 전인 9월 기준 일주일간 약 2만명(COVID-19 이후 이상하게 1만명으로 많이 떨어졌다.)
- 3개월 전인 9월 기준 실시간 접속자 약 50명(위와 마찬가지로 최근에는 실시간 접속자가 많을 때는 약 30명 정도로 줄었다.)
꽤나 많은분들이 들어오셔서 블로그에 글을 쓸때 내용의 질을 고려하지 않을수가 없게되었다. 이전에 한번 VS에서는 빌드가 안되는데 나는 리눅스에서 빌드를 해서 문제 없다고 댓글을 달았다가.. 싫어요? 비슷한걸 받은적이 있다. 이제 유입되는 사람들도 많아지다보니 욕심이 생기는데 내용의 질을 높이고 싶었고 들어오신분들이 원하는걸 찾고 나가셨으면 한다.
최근에는 방문자 유입이 많이 줄었는데 코로나의 확산과 재택근무의 증가와 비슷하게 줄었는데 이는 우연이겠지?! 우연이라고 생각한다ㅋㅋ 질이나 내용에 문제가 있어서 방문자가 줄었을거라 생각하는데 분석이 필요해 보인다…ㅠㅠ 이렇게 최근에는 블로그 작성보다 방문자들을 더 고려하는 모습을 발견하게 되었다. 내용보다 방문자를 더 고려해서 글을 쓰는 모습을 발견하게 되었는데 과연 이게 좋은걸까?! 다음에서 정리해보자
지금까지 블로그에 글을 작성하는 경우
- 공부하다가 모르는 부분을 조사했을 때
- 나중에 참고할 사항이라고 생각할 때
- 알아낸 부분중에 공유하면 좋을거 같다고 생각할 때
- 기분이 안좋거나 생산적인 일을 하고싶을 때
최근 2년정도 블로그 작성하던 내용을 보면 대체로 어떤 내용을 공부하다가 알게된 내용이나 나중에 사용할 수 있는 부분들이 주가 된거 같다. 주로 공부나 호기심에 의한 부분들이었던거 같다. 그래서 언제는 내용이 굉장히 단순하다가도 어떤 내용은 길기도 하다. 바로 위에 정리한 먼저 3개의 경우에 내용을 주로 작성하고 남들에게 보여준다 그리고 설명한다는 생각으로 작성해왔다.
마지막으로 기분이 안좋거나 뭐라도 생산적인 일을 하고 싶을때 글을 쓰는거 같기도 하다. 뭐라도 생산적인 일을 하면 그래도 뿌듯해지니까 그런거 같다. 여기는 기술 블로그니 기분이나 생산적인 일을 왜 하고 싶은지에 대한 글은 넣어두겠다!
최근에 블로그를 작성할 때 마음가짐
- 눈에는 잘 들어오나?
- 설명이 이해가 잘되게 정리가 되었나?
- 다음에 볼 때 기억이 다 날 수 있을까?
- 더 필요한 내용은 없나?
최근에는 블로그에 글을 작성할때 점점.. 보여지는거에 지나치게 신경쓰지 않았나? 라는 생각이 든다. 내가 정리하고 내가 공부할 내용을 정리해두는 공간인데 늘어나는 방문자수에 보여지는 것에 더 신경을 쓰게 된거 같다 마치 책을 쓰는것처럼? 당연히 이쁘게 설명을 잘 써놓으면 좋은데 너무 지나치게 신경쓴 나머지 내용보다는 구성과 글을 전체적인 맥락에만 초점을 맞추는거 같다. 배보다 배꼽이 크다고 해야하나? 더 많고 깊은 내용을 쓰고 싶은데 구조와 설명에 지나치게 신경을 쓰는거 같다.
아무래도 사용자가 많아짐에 따라 생긴거 같은데 외적인 부분에 시간을 너무 쓰는거 같아서 앞으로는 좀 다른 마음가짐으로 글을 쓰고싶다.
앞으로 내가 기대하는 블로그의 모습과 내용
- 깊은 내용과 전문적인 내용
- 일상적인 내 공부와 궁금증들을 조사 및 정리하는 내용
솔직하게 지금 작성하는 그대로 블로그를 운영해도 문제는 없다. 포트폴리오를 완성할 수 있고 방문자들은 꾸준하게 들어오고 있기 때문이다. 그래도 최근에 약간 기술 블로그를 작성하면서 실력을 더 발전하고 싶은 마음이 생겨서 위와 같은 목표들을 잡았다. 이런저런 블로그를 보다가 인공지능이나 시스템 관련 심도 있는 논문을 정리한 블로그들을 봤는데 그런걸 보고 배움과 깊음에 대한 욕심이 생겼다.
사람들이 찾아오고 필요한 정보들을 알아갈 수 있는 블로그가 된거 같아서 이제는 실력 있는 분들이 들어와서 지식의 깊이를 확장하고 나갔으면 좋겠다는 마음이 생겼다. 물론! 개인적으로 이제 더 전문분야를 깊이 있게 파고 싶은 마음도 있다. 실력은 많이 부족하지만 논문이나 이러한 부분들 아니면 Reddit과 같은 곳에서 나오는 최신 기술들에 대해서 정리해보거나 사용후기를 써볼까 한다.
구체적인 계획
- 전문적인 내용의 글을 추가
- 기존과 같이 글을 쓰던 방식은 유지
기존에 잘하던 습관은 유지하되 더 앞으로 개선하는 방향을 선택했다.
앞으로는 논문이나 최신 기술들을 더 깊이있게 쓰고 내 생각을 작성하려한다. 일도 더 바빠지고 기존에 하던거에서 추가하던거라 시간이 더 걸리겠지만 새로운 글을 쓰는 간격이 길어지더라도 이제는 내용과 깊이에 신경쓰는 블로그를 작성해보려 한다.
“깊이 있는 글을 쓰자”가 앞으로의 테마다! 물론 현재 잘 유지하고 있는 “공부하고 조사한 내용들을 정리하자”는 유지!
이외에 여러 고려사항들?
블로그 템플릿
블로그 템플릿이 검색, 태그, 카테고리 그리고 글들의 목록을 다 가져오는 기능중심으로 되어있기 때문에 약간? 시각적으로 이쁘지 않은거 같은 느낌이 있다. 그래도 일단 내용의 전달에 있어서는 문제가 없다고 생각하기 때문에 후순위로 미뤘다.
방문자 데이터 분석
방문자들이 줄고 있다.. 코로나 때문인지는 모르겠지만 내 블로그에 들어오는 방문자들을 토대로 데이터 분석을 진행해보고 싶다. 가장 먼저는 어떤 글들을 사람들이 많이 찾았는지의 비율을 정리해보고 싶다. 뽑아낼 가치?가 있을지는 모르겠지만 호기심이 있다.
방문자 소통
방문자들이 댓글을 편하게 사용할 수 있게 도와드리고 싶은데 아직 오픈소스로는 Disqus가 제일인거 같다.. 이걸 확 그냥 만들어버릴까? 하하.. 아마 만들면 1년은 걸릴거 같은데..
여전히 정리할게 남은 많은 내용들
연말에 마무리 차원에서 쓰느라 급하게 쓴거 같은 느낌이 있다. 태그 같은 경우 직접 커스터마이징 한거랑 그 외에 여러 커스터마이징도 꽤 들어갔는데 그러한 부분들도 정리하면 좋을거 같고 FullStory와 같은 도구들도 붙여보고 싶다. 지금 생각은 안나지만 글들을 쓰면서 여러 많은 경우들이 있었고 재밌었던 부분들이 있었는데 하나하나 정리하지 못한게 아쉽다.
마무리
꾸준함이 중요하다. 앞으로도 꾸준하게 작성하자! 비록 쓰는 간격이 길어지더라도! 최대한!