쉘 스크립트에서 Redirect(‘>’)와 Pipe(‘|’)의 차이를 간략하게 알아보자
환경 및 선수조건
- Linux 기반 시스템에 대한 이해
- Bash shell(/bin/bash)의 사용법
Redirect와 Pipe의 차이
Redirect
프로그램 > 파일: 프로그램의 결과 혹은 출력(output)을 파일이나 다른 스트림으로 전달하거나 남길 때 사용됨
$ ps -ef > text.txt
Pipe
프로그램1 | 프로그램2: 프로세스 혹은 실행된 프로그램의 결과를 다른 프로그램으로 넘겨줄 때 사용됨
$ ps -ef > text.txt
Redirect의 예시
- 왼쪽 명령어의 결과(output)를 text.txt파일에 남깁니다.
- 즉, 좌측의
stdout을 우측의 파일에 남깁니다.
$ ps -ef > text.txt
Pipe의 예시
- 왼쪽 명령어의 결과(output)을 오른쪽에 있는 명령어에 입력(input)으로 전달합니다.
- 즉, 좌측의
stdout을 우측의stdin으로 된다고 생각하시면 됩니다.
$ ps -ef | grep bash
Redirect

Redirection이란IPC(Interprocess Communication)중에 하나로 사진과 같이 standard stream을 유저가 정의한 형태(파일 형태)로 redirect해주는것을 의미합니다.
사용방법
프로그램의 결과를 파일로 저장하기
- command의 출력물을(
stdout을) filename에 기록하며 파일이 없다면 생성합니다. - 존재하는 파일에 추가를 하려면
>>를 사용하면 됩니다.
$ command > filename
$ command >> filename
파일을 프로그램의 입력으로 받기
- filename을 command의
stdin으로 입력 받습니다. 즉, filename에 있는 값들로 입력을 받습니다.
$ command < filename
프로그램의 입력(공백과 개행 포함)을 직접하기
- command에 multiline으로 입력을 보냅니다.
- 아래와 같은
<<을 사용하면 cat을 통해서 콘솔에 space와 tab을 추가한 문자열들을 출력할수도 있고 ssh를 이용해 접속한 서버에서 명령어를 실행할 수도 있습니다.
$ command << END
abcd efdg spcace
available as standard input
END
문자열을 프로그램의 입력으로 넣기
- 우측의 문자열을 command에
stdin의 값으로 사용합니다.
$ command <<< "string as inputs"
Standard file handle을 이용하는 예제
Error를 파일로 출력하기
stderr를 filename에 출력하기- 숫자 2는
stderr의 file descriptor 의미합니다! stdin=0stdout=1stderr=2
$ command 2> filename
stderr를 stdout으로 출력하기
stderr를stdout으로 출력하기- 1을 파일명과 구분해주기 위해서
&를 사용합니다.
$ command 2>&1 filename
응용: stderr와 stdout redirection 같이쓰기
stdout을 파일에 남기고stderr을stdout으로 내보내기
$ find / -name .profile > results 2>&1
Pipe
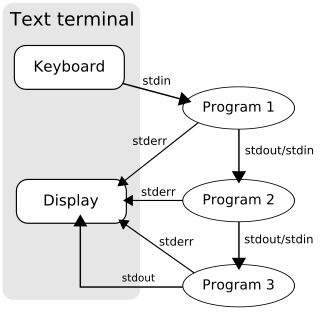
Pipe이란IPC(Interprocess Communication)중에 하나로 사진과 같이 한 프로그램의stdout을 다른프로그램의stdin으로 전달하는 방법입니다. 즉, 한 프로그램의 출력을 다른 프로그램의 입력값으로 전달해주는 방법입니다.- 사진에 보이는 바와같이 stdout은 전달해주지만 stderr는 Display로 출력해줌을 알 수 있습니다.
- Unix system call인
pipe()기반으로 만들어졌으며 buffer에다가 최대 65536 bytes (64KiB)(Linux 기준)까지 기록을 해두고 읽어가는 방식으로 구현이 되어있습니다.
사용방법
기본적인 ‘|’ 사용방법
|를 이용해서 왼쪽 프로그램의 실행결과를 오른쪽 프로그램으로 넘깁니다.
$ ps -ef | grep bash